Outdoor Classroom
For this project we needed to create an outdoor classroom that people can use for education or relaxation. It had to be within the limitations of permits and legal issues, illicit electricity, and a budget of $5000. This was an extensive project; we had to learn about the structures, behaviors, and development of atoms, molecules, and solar angles. We also learned about heat transfer. We did this by doing the Solar Water Heater Lab. This lab focused on radiation, conduction, insulation, and provided us with ways to heat water in our room efficiently with solar energy.
Atoms
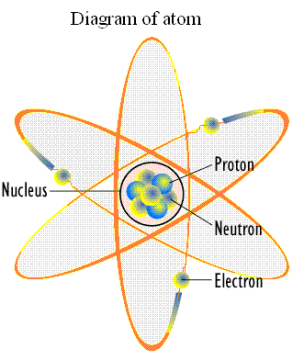
Initially we learned about atoms and molecules. We learned the structures of atoms, then about how the number of protons and neutrons were equally represented in the nucleus, and we learned that the number of electrons would determine if an atom would be ionized. This part was pretty easy compared to when we learned about the mechanics of an electron. We were introduced to the quantum leap, the idea that an electron can exist virtually everywhere and nowhere at the same time within a certain area in a shape. Then we learned that the physical state of the atom is dependent on the movement and subsequent thermal energy of the atom, and the faster an atom moves, it has more energy to break free of the bonds between other molecules. This causes it to change state. When an atom is coldest, and has very little energy to break its bonds, it is in a solid state, but when it heats up and gains enough energy to loosen the bonds, the molecules can move more freely, and it is in a liquid form. In the third state, the molecules have enough thermal energy to completely free itself, not bound to one another, causing it to turn into a gas. Finally, we learned how the molecule's movement is related to heat; molecules that are moving faster generate more thermal energy and heat, and molecules that are moving more slowly generate less thermal energy and heat. We also learned that if we increased the heat of an object the pressure and density of that object would decrease, while the volume would increase.
Solar Angles
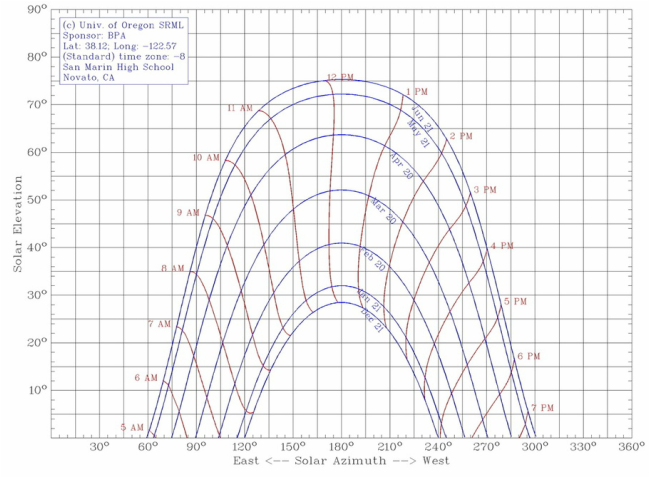
We then learned about solar angles. We learned how the tilt of the axis of the Earth would result in either the Northern or Southern hemisphere being angled towards the Sun, and when they were tilted towards the Sun, it would be considered to be summer in that region. This could be explained through the simple concept regarding the fact that when the sunlight is impacting an area directly, it radiates more solar energy there than it does if hits a location indirectly, or at an angle, which is what happens during the autumn and spring seasons. To confirm this information, we did a small lab in which we shone a flashlight on a piece of paper at different angles from the same height, and we would measure the area over which the light was cast. From there, we used mathematical equations to figure out the concentration of light as compared to the initial, 90 degree light, and we came to this realization. Each source of light gives off a certain amount of light.
We then learned about solar angles. We learned how the tilt of the axis of the Earth would result in either the Northern or Southern hemisphere being angled towards the Sun, and when they were tilted towards the Sun, it would be considered to be summer in that region. This could be explained through the simple concept regarding the fact that when the sunlight is impacting an area directly, it radiates more solar energy there than it does if hits a location indirectly, or at an angle, which is what happens during the autumn and spring seasons. To confirm this information, we did a small lab in which we shone a flashlight on a piece of paper at different angles from the same height, and we would measure the area over which the light was cast. From there, we used mathematical equations to figure out the concentration of light as compared to the initial, 90 degree light, and we came to this realization. Each source of light gives off a certain amount of light.
Solar Water Heater Lab
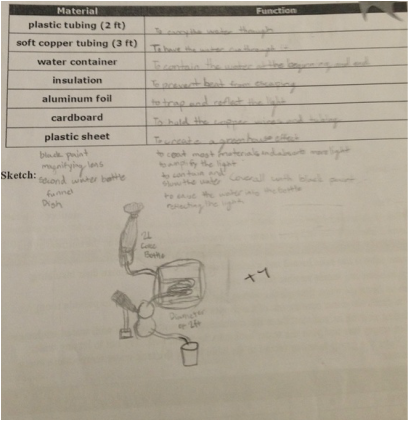
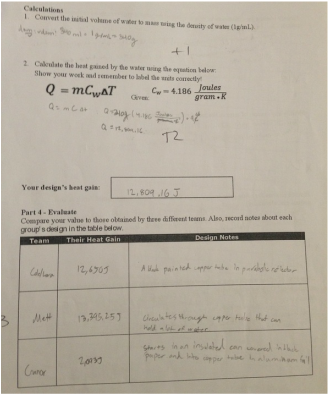
Next we did the Solar Water Heater Lab. We did not use this for our classroom. It was used to show us how to design a water heater and how we can effectively heat up water using the energy of the sun. The first thing that we did was design a box where the strength of the sun would be the strongest. We decided to use a rectangle. We then decided to cover it with plastic to give it a greenhouse effect. We then designed a system in which the water would flow through and heat up. The system we designed was water would be poured through an an opening of the pipe and would flow through, heating up, where it eventually end up in a copper pot. Next, we thought of ways to insulate our copper pot, and magic towels along with ripped up cotton balls were the best options. We then decided that we wanted to have a way of reflecting the sunlight, towards our pot. To achieve this, we lined the entire heater with mirrors that I bought from Dollar Tree, made a parabolic reflector that our container would be suspended over, so that all of the light could be reflected at the focus of the parabola. We then hot glued a large mirror to a 45 degree angled piece of wood, and put it behind the box to reflect even more light. The final touch to our design was that we used magnifying glasses to focus the light on certain points of our container, and that resulted in us heating up about 340 ml of water by 18 degrees Celsius.
Next we did the Solar Water Heater Lab. We did not use this for our classroom. It was used to show us how to design a water heater and how we can effectively heat up water using the energy of the sun. The first thing that we did was design a box where the strength of the sun would be the strongest. We decided to use a rectangle. We then decided to cover it with plastic to give it a greenhouse effect. We then designed a system in which the water would flow through and heat up. The system we designed was water would be poured through an an opening of the pipe and would flow through, heating up, where it eventually end up in a copper pot. Next, we thought of ways to insulate our copper pot, and magic towels along with ripped up cotton balls were the best options. We then decided that we wanted to have a way of reflecting the sunlight, towards our pot. To achieve this, we lined the entire heater with mirrors that I bought from Dollar Tree, made a parabolic reflector that our container would be suspended over, so that all of the light could be reflected at the focus of the parabola. We then hot glued a large mirror to a 45 degree angled piece of wood, and put it behind the box to reflect even more light. The final touch to our design was that we used magnifying glasses to focus the light on certain points of our container, and that resulted in us heating up about 340 ml of water by 18 degrees Celsius.
|
|
Survey For the beginning of our classroom design, the STEM class had to design a survey to find out what the teachers and students, who took the survey, wanted. To do this each table group would come up with one or two questions about a certain topic. It could have been about what seating arrangement, what amenities they wanted, esc. After this, we had compiled the questions from our class and some from 6°/7°, made the survey. You can see the survey results if you click on the button below.
For the next part of the project I moved groups. I loved my previous group which consisted of Justin, Casey, Aditya, and Kendall, but I thougt another group's design was better suited for me.
Site Selection
In the next part we picked a site for our outdoor classroom. A lot of consideration had to be done for our site because it needed to fit all the needs of the students and teachers. We had four sites that we considered, but ultimately choose the location between the art room and cafeteria. We choose this location because it because suited more clients needs and wants. Which was level ground, sunlight/shade exposure, distance from campus, ground quality, WiFi strength, and wind block. This location's ground was level and has buildings between it to block sun and wind. It also is right in the middle of campus which means easy access, sturdy ground material, and has excellent WiFi strength. We also picked it because there is already a 41 foot by 26 foot concrete perimeter around it, and it already has a pathway to get to it.
Materials Heat Testing Lab
We then had to do another lab was figure out what materials heated up or cooled the quickest or slowest. We also tested what materials absorbed the most water and what materials dried out the quickest. So together as a class we designed this lab to test all the possible materials we would be using, such as gravel, pine, aluminum, redwood, plexiglass, brick, plastic, etc. First we recorded the starting temperature of the material and then placed it under a heat lamp and recorded the temperature every two minutes for 10 minutes. Then we removed it, and checked every two minutes util it returned to its original room temperature. For the water part of the lab we weighed our material and recorded the weight, and then we immersed it with water and checked every five minutes to see what was happening to it. We did this until it felt dry and it returned to its original weight.
We then had to do another lab was figure out what materials heated up or cooled the quickest or slowest. We also tested what materials absorbed the most water and what materials dried out the quickest. So together as a class we designed this lab to test all the possible materials we would be using, such as gravel, pine, aluminum, redwood, plexiglass, brick, plastic, etc. First we recorded the starting temperature of the material and then placed it under a heat lamp and recorded the temperature every two minutes for 10 minutes. Then we removed it, and checked every two minutes util it returned to its original room temperature. For the water part of the lab we weighed our material and recorded the weight, and then we immersed it with water and checked every five minutes to see what was happening to it. We did this until it felt dry and it returned to its original weight.
Design and Presenation
For our design we decided to create a pergola, a shade structure, with a metal sheeting on top. We made our pergola cover only half benches so that students have the option of sitting in the sun or in the shade. The pergola was 24 foot by 10 foot. We had six students benches that we would have bought from Lowe's and the are 72-in Brown Pine Picnic Tables. We also designed a Teacher's desk and it was 4.5 foot by 2.5 foot redwood table with a plexiglass table top. You can see the rest of our design here
For our design we decided to create a pergola, a shade structure, with a metal sheeting on top. We made our pergola cover only half benches so that students have the option of sitting in the sun or in the shade. The pergola was 24 foot by 10 foot. We had six students benches that we would have bought from Lowe's and the are 72-in Brown Pine Picnic Tables. We also designed a Teacher's desk and it was 4.5 foot by 2.5 foot redwood table with a plexiglass table top. You can see the rest of our design here
Wind Turbine Lab
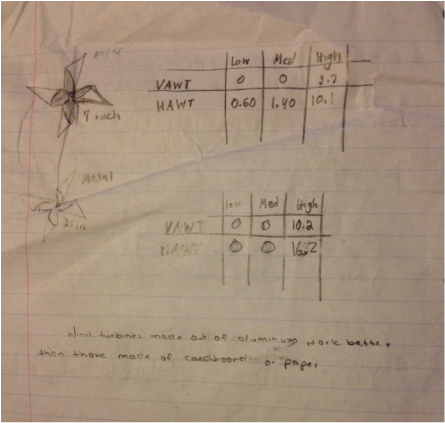
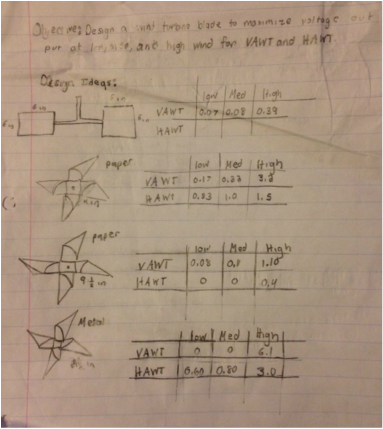
Our goal for this lab was to design a wind turbine blade to maximize voltage output at low, medium, and high wind speeds for VAWT (vertical axis wind turbine) and HAWT (vertical axis wind turbine). Our group found out that aluminium was the best material and that pinwheels are the best design, especially at high wind speeds. Pinwheels were the best design because it got more energy in VAWT and HAWT in higher wind speeds then any other one.This is because they can spin the fastest because of their wind pockets and air flow. Metal pinwheel are better than the other types of material because they bend less to the wind and that causes it to be able to catch more wind, so it transfer more kinetic energy to the turbine, unlike a flimsy paper one.
Our goal for this lab was to design a wind turbine blade to maximize voltage output at low, medium, and high wind speeds for VAWT (vertical axis wind turbine) and HAWT (vertical axis wind turbine). Our group found out that aluminium was the best material and that pinwheels are the best design, especially at high wind speeds. Pinwheels were the best design because it got more energy in VAWT and HAWT in higher wind speeds then any other one.This is because they can spin the fastest because of their wind pockets and air flow. Metal pinwheel are better than the other types of material because they bend less to the wind and that causes it to be able to catch more wind, so it transfer more kinetic energy to the turbine, unlike a flimsy paper one.
|
|
Concepts
Atoms: Basic structures of all matter
Molecular Structure: Describes the type, arrangement, position, and direction of the bonds linking atoms within a molecule.
States of Matter:
Solid-Molecules barely move. Ex. ice
Liquid- Molecules move around. Ex. water
Gases- Molecules move the fastest. Ex. steam
Specific Heat Capacity: The specific heat capacity is the amount of heat required to change a unit mass of a substance by one degree in temperature.
Conduction: Heat transfer through a solid. Some solids are better at transferring heat (Ex. Copper> Aluminum)
Convection: Movement of heat through a fluid (liquid or gas)
Radiation: Transfer of heat through waves/rays/particles
Insulation: Opposite of conduction (bad at transferring heat)
Laws Of Thermodynamics:
0th Law- Explains Temperature (If two systems are in thermal equilibrium with a third system, they are in equilibrium with each other)
1st Law- Conservation of energy (Energy is neither created or destroyed, but transferred from one form to another. Heat is a form of energy)
2nd Law- Entropy increases (Disorder increases. Over time everything becomes the same temperature)
3rd Law- Temperature can never get to absolute zero. Heat always exists.
Angles Of The Sun: We live in the northern hemisphere so the light that we get from the sun generally comes from the south, although the exact angles of light rays change considerably throughout the day and during different seasons. While designing our home, we had to take these changing angles into consideration.
Reflection
This project was a lot of fun to do. I thought it was really fun to do because we go to do something for our own school. I learned many new things and I got a bit more confused with a few others. I learned about how different materials react to heat and water. I got more confused on atoms and molecules and how some can exist, but then not exist. I loved this project completely.
In our group we functioned very well. We efficiently completed our project, and I'm very proud of it. However, we had a few bumps in the road. Some members were goofing off on their phones, or at times would be walking aimlessly around.
The things I should improve on is leadership. I will at times wait for another person to take charge instead of doing it myself.
